
So what are those BLUE lines in drum scans?
Well long story short they are scratches through the first layer of the emulsion (Color Negative only).
When the scratches are really deep, ie. through all of the layers, you will see the various color dye layers (RGB).
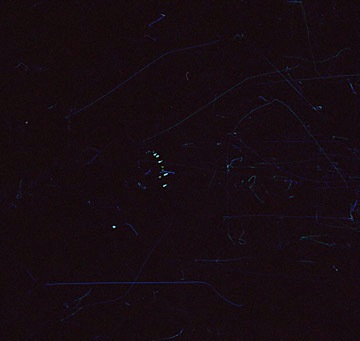
Image shows BLUE scratches in emulsion, 8x10 Kodak Portra Color Neg
We see this often in large format films (4x5+) but it can be helped. Check your dark slide for bowing or spurs. On medium format cameras, check your backs for rough edges or spurs.
Be careful with your film and dont shake the box before processing. When loading your holders in a changing bag, be careful of dust that might live in the bag.
In sandy areas or dusty areas, make sure you are careful not to get dust inside the changing bag.
Film can be delicate but it can take some abuse and still be usable. Have fun with it and remember to avoid the BLUE lines.
This all ties into another article i wrote a while back on film holders and scratches.
Over the last few months, we have received a lot of film that has been scratched by the holders.
This can happen to anyone at anytime, but with some work, it can be avoided.
When the film base lightly scratched, the scans will show it in the blue layer.
Heavier scratches go right through al of the emulsion layers and come out white.
It is extremely time consuming to cleanup and if it is really bad, it can ruin the image completely.
This article came to me last week when i was preparing to load some 12x20 film into my 90+ year old holders.
To say that they have some dust is an understatement. I realized that the scratching that i have seen from my negatives and
my clients could be traced to the dust in the film holders.
There are many techniques and conflicting opinions on how to clean your holders properly. In fact, most if not all of them are great ideas.
It all depends on what you have and if you have time to do it.
Some of the ideas i like are:
1. Use a vacuum to clean the holders. It works most of the time but has some drawbacks.
2. Use a tack cloth and rub the holder down inside and out. Very effective but the tack cloth has to be really tacky.
3. The can of compressed gas is a last resort option to me. It gets out a lot of the particles but it can just blow some of them around.
Not my favorite method but sometimes its all we have.
4. My favorite and what i am doing now is to use a DRS roller or a tacky roller (like the ones for clothing).
They get just about everything!, even what the vacuum misses.
Since i dug out the DRS roller, i have had a much better time scanning my negatives.
I highly recommend it to anyone shooting LF and ULF film.
There are other problems that are present in used holders. Some of the ones that i bought off of ebay have little metal burrs on
the leading edge of the metal insert. I filed them down with a micro file set i bought from radio shack. Always run your fingers
throughout your holders and if you feel something, take care of it immediately. The same thing goes for the dark slides, they can
warp and dent overtime and usually need some TLC.
With some care, film scratches can be virtually eliminated!
-Ian Mazursky
Owner
If you have any questions, please contact us anytime.
Well long story short they are scratches through the first layer of the emulsion (Color Negative only).
When the scratches are really deep, ie. through all of the layers, you will see the various color dye layers (RGB).
Image shows BLUE scratches in emulsion, 8x10 Kodak Portra Color Neg
We see this often in large format films (4x5+) but it can be helped. Check your dark slide for bowing or spurs. On medium format cameras, check your backs for rough edges or spurs.
Be careful with your film and dont shake the box before processing. When loading your holders in a changing bag, be careful of dust that might live in the bag.
In sandy areas or dusty areas, make sure you are careful not to get dust inside the changing bag.
Film can be delicate but it can take some abuse and still be usable. Have fun with it and remember to avoid the BLUE lines.
This all ties into another article i wrote a while back on film holders and scratches.
Over the last few months, we have received a lot of film that has been scratched by the holders.
This can happen to anyone at anytime, but with some work, it can be avoided.
When the film base lightly scratched, the scans will show it in the blue layer.
Heavier scratches go right through al of the emulsion layers and come out white.
It is extremely time consuming to cleanup and if it is really bad, it can ruin the image completely.
This article came to me last week when i was preparing to load some 12x20 film into my 90+ year old holders.
To say that they have some dust is an understatement. I realized that the scratching that i have seen from my negatives and
my clients could be traced to the dust in the film holders.
There are many techniques and conflicting opinions on how to clean your holders properly. In fact, most if not all of them are great ideas.
It all depends on what you have and if you have time to do it.
Some of the ideas i like are:
1. Use a vacuum to clean the holders. It works most of the time but has some drawbacks.
2. Use a tack cloth and rub the holder down inside and out. Very effective but the tack cloth has to be really tacky.
3. The can of compressed gas is a last resort option to me. It gets out a lot of the particles but it can just blow some of them around.
Not my favorite method but sometimes its all we have.
4. My favorite and what i am doing now is to use a DRS roller or a tacky roller (like the ones for clothing).
They get just about everything!, even what the vacuum misses.
Since i dug out the DRS roller, i have had a much better time scanning my negatives.
I highly recommend it to anyone shooting LF and ULF film.
There are other problems that are present in used holders. Some of the ones that i bought off of ebay have little metal burrs on
the leading edge of the metal insert. I filed them down with a micro file set i bought from radio shack. Always run your fingers
throughout your holders and if you feel something, take care of it immediately. The same thing goes for the dark slides, they can
warp and dent overtime and usually need some TLC.
With some care, film scratches can be virtually eliminated!
-Ian Mazursky
Owner
If you have any questions, please contact us anytime.